Prepare the Operation Environment
This guide helps you set up an operation environment to install or upgrade CloudPilot AI.
Prerequisites
- Cloud provider account credentials or an authenticated provider CLI session
- Docker or Kubernetes access
- Basic familiarity with command-line operations
Step 1: Launch the Container Environment
Option 1: Docker Environment
Launch a container with all required tools pre-installed:
docker run -it --restart=unless-stopped --name cloudpilotai \
  public.ecr.aws/cloudpilotai/installationenv:latest \
  bash
Option 2: Kubernetes Pod
For environments without Docker:
kubectl run helper --image=public.ecr.aws/cloudpilotai/installationenv:latest \
  -it --rm --restart=Never -- /bin/bash
Step 2: Configure Cloud Provider Credentials
AWS Configuration
Configure AWS credentials:
aws configureProvide your credentials when prompted:
AWS Access Key ID: <your_access_key>
AWS Secret Access Key: <your_secret_key>
Default region name: us-east-2
Default output format: json
Update kubeconfig for EKS:
mkdir -p ~/.kube
export KUBECONFIG=~/.kube/config
aws eks update-kubeconfig --name <cluster_name> --region us-east-2
Verify setup:
aws sts get-caller-identity
kubectl get nodes
Alibaba Cloud Configuration
Configure Alibaba Cloud credentials:
aliyun configureFollow the prompts:
Access Key ID: <your_access_key>
Access Key Secret: <your_secret_key>
Default Region ID: cn-shenzhen
Default Output Format: json
Default Language: en
Setup kubeconfig for ACK:
mkdir -p ~/.kube
export KUBECONFIG=~/.kube/config
export CLUSTER_NAME=<cluster_name>
export CLUSTER_ID=$(aliyun cs GET /clusters | jq -r --arg CLUSTER_NAME "$CLUSTER_NAME" '.[] | select(.name == $CLUSTER_NAME) | .cluster_id')
aliyun cs GET /k8s/$CLUSTER_ID/user_config | jq -r '.config' > $KUBECONFIG
Verify setup:
kubectl get nodesGCP Configuration
Authenticate with Google Cloud and select the target project:
gcloud auth login
export GCP_PROJECT_ID=<your_project_id>
gcloud config set project "${GCP_PROJECT_ID}"
Prepare kubeconfig for GKE:
mkdir -p ~/.kube
export KUBECONFIG=~/.kube/config
export CLUSTER_NAME=<cluster_name>
export CLUSTER_LOCATION=<cluster_location> # e.g. us-central1-a or us-central1

gcloud container clusters get-credentials "${CLUSTER_NAME}" \
  --location "${CLUSTER_LOCATION}" \
  --project "${GCP_PROJECT_ID}"
Verify setup:
gcloud auth list
kubectl get nodes
helm version
jq --version
GKE note: enable Workload Identity on the cluster before you run the CloudPilot AI Phase 2 install or upgrade flows.
Alternative Setup Using Google Cloud Shell
For GKE operations, Google Cloud Shell is often the simplest environment because gcloud is already available.
After opening Cloud Shell, run the same gcloud config set project and gcloud container clusters get-credentials commands shown in the GCP configuration section, then execute the CloudPilot AI scripts from the console.
Azure Configuration
Authenticate with Azure and select the target subscription:
az login
export AZURE_SUBSCRIPTION_ID=<your_subscription_id>
az account set --subscription "${AZURE_SUBSCRIPTION_ID}"
Prepare kubeconfig for AKS:
mkdir -p ~/.kube
export KUBECONFIG=~/.kube/config
export CLUSTER_NAME=<cluster_name>
export AZURE_RESOURCE_GROUP=<resource_group>

az aks get-credentials \
  --resource-group "${AZURE_RESOURCE_GROUP}" \
  --name "${CLUSTER_NAME}" \
  --overwrite-existing
Verify setup:
az account show --query '{subscriptionId:id, tenantId:tenantId}' -o table
kubectl get nodes
helm version
jq --version
AKS note: enable the AKS OIDC issuer and Microsoft Entra Workload ID before you run the CloudPilot AI Phase 2 install or upgrade flows:
az aks update \
  --resource-group "${AZURE_RESOURCE_GROUP}" \
  --name "${CLUSTER_NAME}" \
  --enable-oidc-issuer \
  --enable-workload-identity
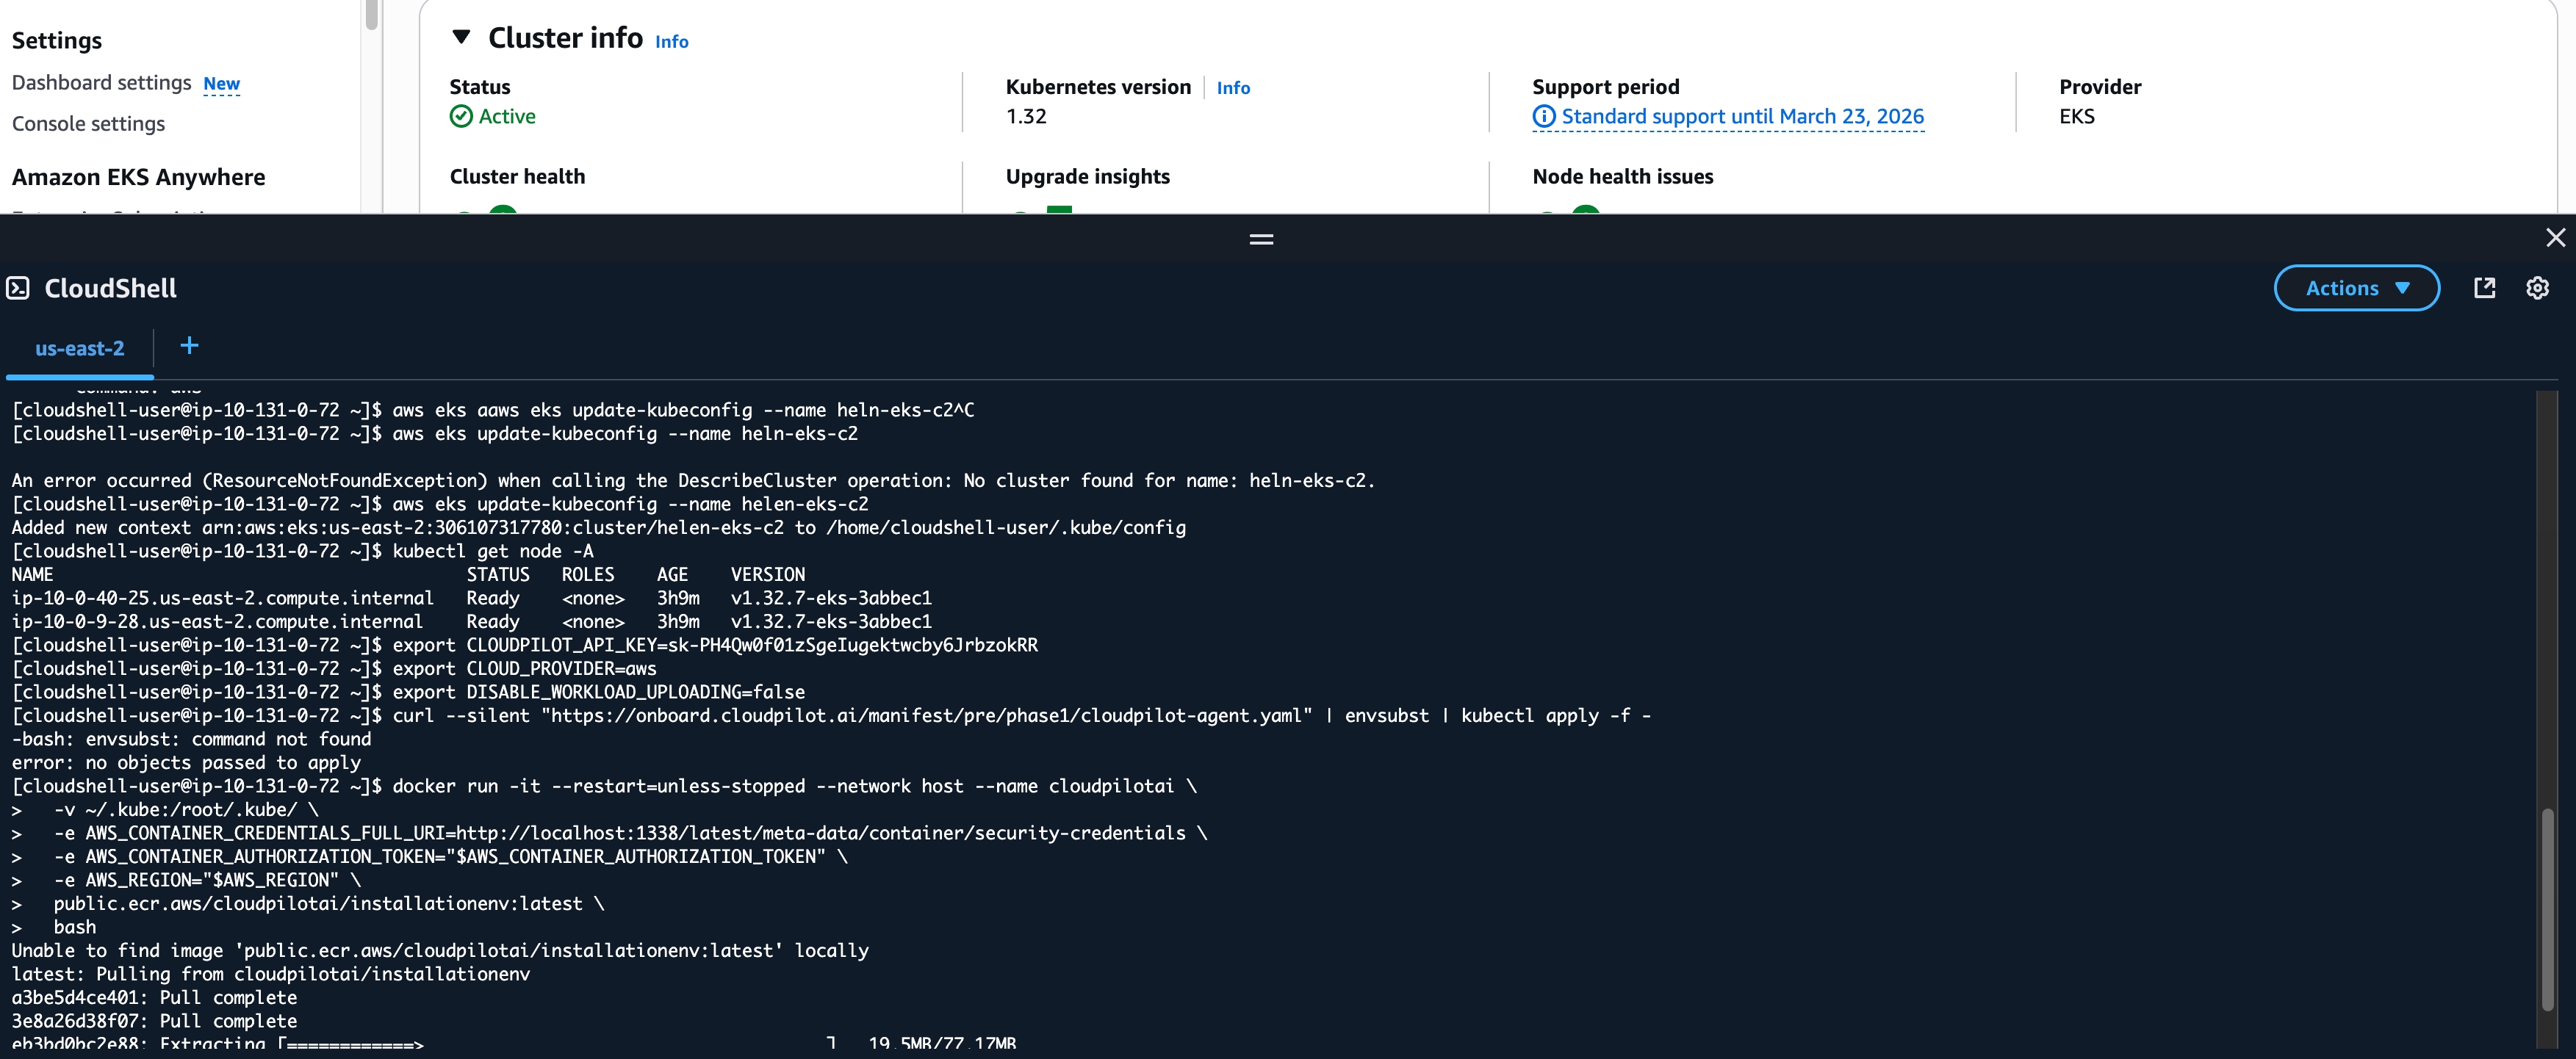
Alternative Setup Using AWS CloudShell
If you don’t have access to a terminal environment for AWS clusters, you can use AWS CloudShell to launch the operational environment. Execute the following command to set up your containerized workspace:
docker run -it --restart=unless-stopped --network host --name cloudpilotai \
  -v ~/.kube:/root/.kube/ \
  -e AWS_CONTAINER_CREDENTIALS_FULL_URI=http://localhost:1338/latest/meta-data/container/security-credentials \
  -e AWS_CONTAINER_AUTHORIZATION_TOKEN="$AWS_CONTAINER_AUTHORIZATION_TOKEN" \
  -e AWS_REGION="$AWS_REGION" \
  public.ecr.aws/cloudpilotai/installationenv:latest \
  bash
It will look like:
Verify setup:
kubectl get nodesNext Steps
Your environment is now configured and ready for CloudPilot AI installation or upgrade operations. For the provider-specific GKE flow, continue with GKE Getting Started.